Odroid XU4 Weeding Spraying Robot
All my projects are located here: https://opencircuits.com/index.php?title=User:Definitionofis
Odroid XU4 Weeding Spraying Robot
The project video shows the completed robot spraying weeds. I proved the prototype works, although it is impracticably slow.
I have not posted any details about the software nor construction here, yet.
some technical details about one issue:
GPIO via Odroid XU4 Shifter Shield
I used all the GPIO IN/OUT pins between 1 and 40 of the first connector. I needed one more. There is only one more on the 12 pin connector but it is 1.8v not 5v logic.
Here I describe how to access pin 5 of CONN11, which is a 12 pin connector which was inaccessible using wiringPi library.
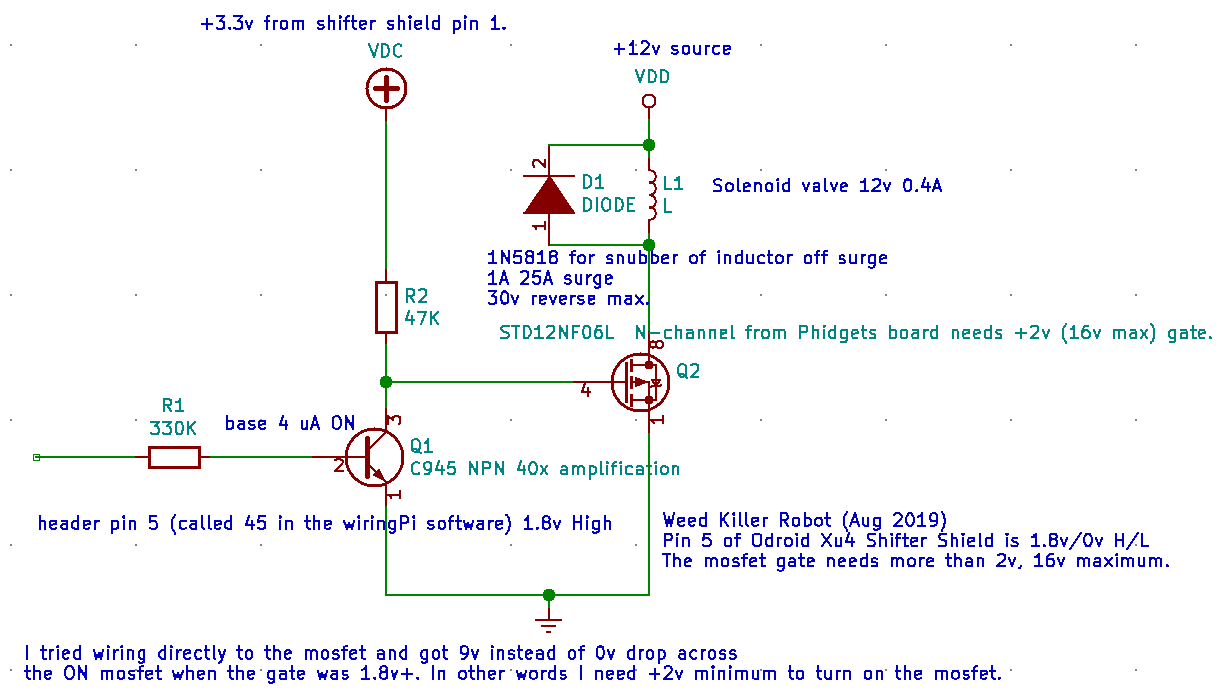
First, here is the wiring diagram from pin 5 to a mosfet to control the solenoid valve which turns the spray OFF/ON. I mounted and soldered the parts onto the spare area of the shifter shield.

I solved how to use that undocumented pin. https://github.com/hardkernel/wiringPi https://ameridroid.com/products/odroid-xu4 https://wiki.odroid.com/odroid-xu4/odroid-xu4
https://wiki.odroid.com/odroid-xu4/software/gpio_register_map#gpio_port_register_map
You can modify the C language file odroidxu3.c which has a placeholder filled with several -1 items as an error return code. The XU3 and XU4 both have 1 to 40 pins accessible from the Shifter Shield. I used all the GPIO (GPX) IN/OUT pins with success. That is the 40 pin connector. https://wiki.odroid.com/accessory/add-on_boards/xu4_shift_shield
Here is the library wiringPi which I started with: https://github.com/hardkernel/wiringPi and you will find a file odroidxu3.c in there.
See the other 12 pin connector of the XU4. Pin 5 is a GPX3.2 IN/OUT pin. I will arbitrarily call it pin 45, as in 40 pins plus the 5th one on the other connector. The CPU register space sees it as mathematically adjacent to GPX3.1, which is pin 36, GPX3.1 and CONN11/pin 5 is GPX3.2. https://wiki.odroid.com/odroid-xu4/software/gpio_register_map#gpio_port_register_map
You can simply change one number from -1 to 34 without understanding why:
Change odroidxu3.c and recompile the library. Then you can simply do things like digitalWrite(45, 1); and pinMode (45, OUTPUT ) and instead of getting a return -1 error you will get proper success where previously the range of pins was 1 to 40.
Here is the change to odroidxu3.c See the number 34 in there, just below "//Not Used"? That was a -1. Change the -1 to a 34 and recompile. That is all you have to do. That 34 is in the 45th position thus pin 45.
static const int phyToGpio[64] = {
      // physical header pin number to native gpio number
      -1,             //  0
      -1,  -1,        //  1 |  2 : 3.3V, 5.0V
      209, -1,        //  3 |  4 : GPB3.2(I2C_1.SDA), 5.0V
      210, -1,        //  5 |  6 : GPB3.3(I2C_1.SCL), GND
      18, 172,        //  7 |  8 : GPX1.2, GPA0.1(UART_0.TXD)
      -1, 171,        //  9 | 10 : GND, GPA0.0(UART_0.RXD)
      174,173,        // 11 | 12 : GPA0.3(UART_0.CTSN), GPA0.2(UART_0.RTSN)
      21,  -1,        // 13 | 14 : GPX1.5, GND
      22,  19,        // 15 | 16 : GPX1.6, GPX1.3
      -1,  23,        // 17 | 18 : 3.3V, GPX1.7
      192, -1,        // 19 | 20 : GPA2.7(SPI_1.MOSI), GND
      191, 24,        // 21 | 22 : GPA2.6(SPI_1.MISO), GPX2.0
      189,190,        // 23 | 24 : GPA2.4(SPI_1.SCLK), GPA2.5(SPI_1.CSN)
      -1,  25,        // 25 | 26 : GND, GPX2.1
      187,188,        // 27 | 28 : GPA2.2(I2C_5.SDA), GPA2.4(I2C_5.SCL)
      28,  -1,        // 29 | 30 : GPX2.4, GND
      30,  29,        // 31 | 32 : GPX2.6, GPX2.5
      31,  -1,        // 33 | 34 : GPX2.7, GND
      -1,  33,        // 35 | 36 : PWR_ON(INPUT), GPX3.1
      -1,  -1,        // 37 | 38 : ADC_0.AIN0, 1.8V REF OUT
      -1,  -1,        // 39 | 40 : GND, AADC_0.AIN3
      // Not used  (August 2, 2019, add pin 45 to be pin 5 of CON11 Odroid Shifter Shield XU4
      -1, -1,
      -1, -1,
      34, -1, // pin 5 of CONN11 GPX3.2(#34) wiki.odroid.com/odroid-xu4/hardware/expansion_connectors#gpio_map_for_wiringpi_library_con10_2_x_15
      -1, -1, // 41...48
      -1, -1,
      -1, -1,
      -1, -1,
      -1, -1, // 49...56
      -1, -1,
      -1, -1,
      -1, -1,
      -1      // 57...63
};
I am using Phys mode. I never tested other modes.